Most advice about 360 degree camera real estate starts with the wrong question: “Which camera is best?” That question assumes the camera is the business decision. It isn't. The decision is whether a dedicated camera produces enough usable listing content, quickly enough, to justify the capture, editing, publishing, and measurement work around it.
A camera can create an impressive panorama and still be the wrong tool for a solo agent. A phone workflow or AI panorama platform may deliver most of the buyer experience with less operational friction. On the other hand, a photographer handling repeated listings, difficult interiors, or branded tours may need better sensors, reliable stitching, and consistent exports. The right choice depends on who shoots, who edits, and where the tour will be published.
Virtual tours have moved from specialist production into mainstream real estate marketing. A commercial real estate survey cited by Invision Studio's history of 360 virtual tours found that 75% of professionals currently use virtual tours, with adoption reaching 86% at firms earning $50M–$500M and 79% at firms above $500M in revenue. Yet peer-reviewed Harvard Business School research measured virtual-tour adoption in 21.63% of houses during its observation window, according to the HBS paper on 3D virtual tours. That gap says one thing clearly: the opportunity isn't just buying hardware. It's building a repeatable system.
Table of Contents
- Why Most Agents Buy the Wrong 360 Camera
- How 360 Capture Actually Works in Real Estate
- Specs That Actually Matter for Listings
- A Repeatable Shooting Workflow Agents Can Run
- Cameras, Phones, and AI Panoramas Compared
- Measuring ROI Beyond Extra Pageviews
- Publishing, Integrations, and Do's and Don'ts
- Your 90-Day 360 Rollout Plan
Why Most Agents Buy the Wrong 360 Camera
The wrong question is usually, “Which 360 camera is best?” The better test is operational: do you need dedicated hardware, or will a phone plus an AI panorama platform deliver most of the buyer experience at a fraction of the cost?
Agents often buy a camera, then discover that capture is only the beginning. Each listing still requires staging, exposure control, tripod removal, stitching review, scene ordering, hotspot placement, publishing, and performance tracking. A dedicated camera is useful only when its output saves enough time or produces enough quality to justify that workload.
A low purchase price can hide a high labor cost. Smaller sensors may struggle with bright windows beside dark walls. Automatic stitching can misalign door frames, mirrors, railings, and countertops. Apps require updates, batteries require charging, and the first real shoot may expose the need for a stronger tripod, extension pole, or remote trigger.
Practical rule: A cheap camera is expensive when every listing creates another editing problem.
The history explains why buyers focus so heavily on hardware. Invision Studio's timeline traces virtual tours from panoramic experiments in the 1990s to Google Street View's 2007 launch and the 2013 launch of Ricoh Theta, widely cited as the world's first 360° camera. Those milestones helped move immersive capture toward consumer hardware. Easier access to cameras did not remove the production work.
Three questions before any purchase
Who shoots? A solo agent needs a fast, forgiving process. A photographer can justify more manual control when those skills support repeated property shoots.
Who edits? If nobody wants to correct seams, retouch the nadir, and organize scenes, choose a workflow with dependable mobile processing. Software or outsourcing may be a better investment than a more advanced camera.
How is the tour distributed? A branded website, an MLS link, and Google Street View impose different publishing requirements. Attractive files are not enough if exports, uploads, or integrations delay the listing.
Test the complete workflow before buying. Shoot one representative property, process it, publish it, and measure the labor involved. If a phone and AI panorama platform produce a buyer-ready result with less setup, use them. Choose dedicated hardware when it delivers visibly better interiors, repeatable output, or faster production across enough listings to repay the added cost.
The camera is one component. The profitable decision is the system around it.
How 360 Capture Actually Works in Real Estate
A 360 real estate image records the view in every direction from one position. The easiest mental model is a room wrapped around the inside of a globe. The panorama is flattened into a rectangular file, then a tour player maps that file back onto a sphere so a viewer can look left, right, up, and down from the camera position.
That flattened file is usually a 2:1 equirectangular panorama. Its width is twice its height, and the format matters because tour platforms, web viewers, and publishing tools expect the panorama to be arranged this way. A camera body can capture a technically impressive image, but a poor export, weak stitching process, or excessive platform compression can still make the final tour look soft.
A listing tour normally connects multiple viewpoints. Each room becomes a scene, and hotspots let the viewer move from the kitchen to the living room, or from a bedroom to the hallway. The result isn't a conventional video. It's an interactive sequence in which the buyer controls the direction and pace.
The technical details that affect the viewer
Monoscopic capture places a single viewpoint at the center of the scene. It works well for standard listing exploration and is the normal choice for most real estate tours. Stereoscopic capture creates separate views for depth perception and is more relevant to specialized headset experiences, not routine MLS distribution.
The nadir is the area directly below the camera. A tripod or monopod often appears there, so nadir patching replaces or conceals that area with a clean floor image, logo, or platform-generated mask. Without cleanup, the viewer may see a distracting support stand in the middle of an otherwise polished room.
The 2:1 format also explains why resolution cannot be judged from a headline alone. The image spreads across a full sphere, so the viewer sees only part of the total pixels at any moment. Zooming, hotspot graphics, browser scaling, and platform exports consume detail. A guide to taking 360 photos for real estate provides a practical explanation of the capture process, but the central principle is simple: the panorama format and delivery path determine how much detail survives.
Specs That Actually Matter for Listings
Megapixels and 8K labels attract attention because they're easy to compare. They aren't the first specifications a real estate team should prioritize. Interior work depends more heavily on sensor size, dynamic range, HDR behavior, and stitching reliability, especially in rooms where daylight enters through large windows.
A larger sensor collects more light and generally produces cleaner interior images in mixed lighting. That matters when the camera faces a bright exterior view while also recording darker walls, flooring, and furniture. BoxBrownie's guide to choosing a 360 camera for real estate specifically emphasizes sensor size and dynamic range over headline megapixels, and identifies dual 1-inch sensor cameras such as the Ricoh Theta Z1 and Theta X class as strong choices when window detail and low-noise interiors matter.
The professional shortlist
Sensor and dynamic range come first. A smaller-sensor 8K model may produce a sharper image in favorable light, yet still lose shadow detail or show more noise in a window-heavy room. The camera should be tested in an actual listing, not only in a bright showroom.
HDR support is practical, not decorative. Bracketing or computational HDR can preserve the relationship between a bright window and a darker interior. It won't fix a badly positioned camera or an overexposed exterior, but it gives the team more usable exposure information to work with.
Resolution needs a delivery target. The same BoxBrownie guidance identifies 23MP equirectangular output as a practical professional baseline for real estate, balancing detail and usable HDR performance. That recommendation is more useful than choosing a model solely because its video mode carries a larger number.
Stitching quality protects straight lines. Door frames, cabinets, mirrors, and countertops expose stitching errors quickly. In-camera stitching saves time, while desktop stitching can provide more control. The right choice depends on whether the team values speed or post-production precision.
Five-minute evaluation checklist
Before buying, a team should confirm that the camera:
- Handles mixed light: The sample room includes both a bright window and a shadowed wall.
- Exports clean panoramas: The output works in the intended 2:1 equirectangular format.
- Keeps seams controlled: Straight architectural lines remain credible near lens boundaries.
- Supports a stable app: The phone can trigger, preview, transfer, and review without repeated connection failures.
- Survives a shoot day: Battery capacity, charging options, storage, and file handling fit the team's property schedule.
A camera that wins on paper but loses on app stability is a poor production camera. A model with excellent image quality but an awkward transfer process can create more labor than it removes.
A Repeatable Shooting Workflow Agents Can Run
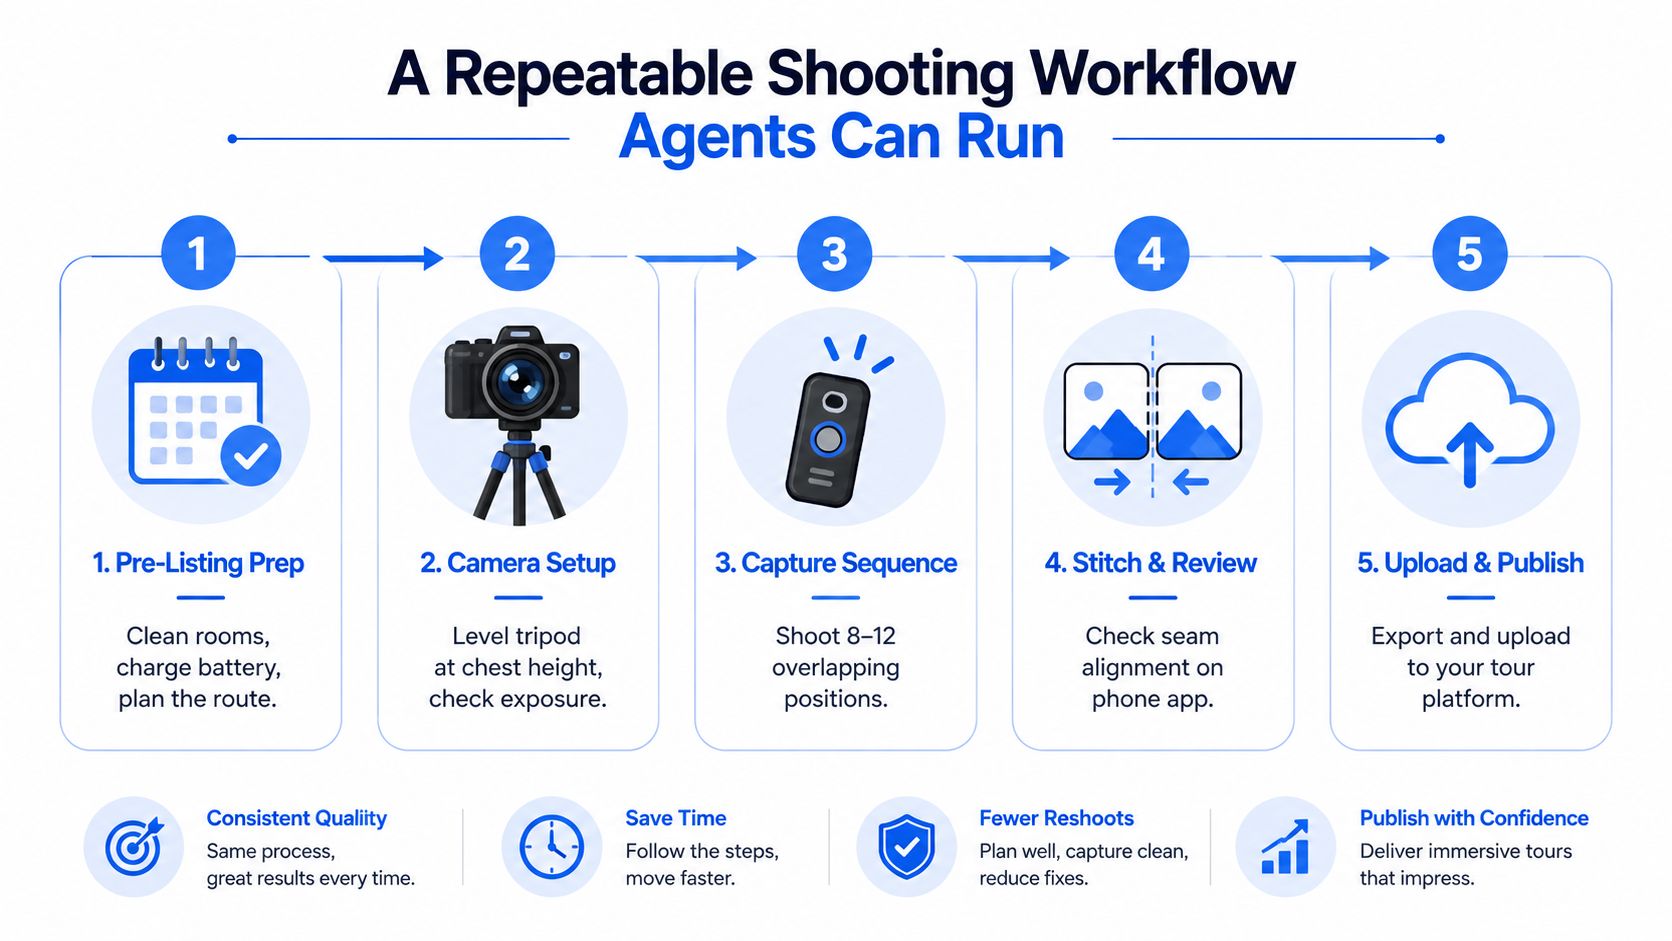
The best workflow starts before the camera leaves its case. The property should be treated as a complete visual environment because 360 capture records the corners that a conventional photographer might exclude. Personal items, open toilet lids, tangled cables, and half-finished cleaning jobs become part of the buyer's view.
The agent or photographer should turn on practical lights, control blinds for a deliberate balance of exterior and interior exposure, close doors that shouldn't be featured, and inspect mirrors for unwanted reflections. A level tripod or monopod should sit at a consistent chest-height viewpoint, positioned to show the room's geometry rather than pressed against a wall.
A field checklist
Prepare the route. Start at the entry and plan a logical movement through the home. Include important transitions such as hallways, stair landings, and unusual layout changes.
Place the camera deliberately. Center the viewpoint where possible. In a small bedroom, a corner may be necessary, but the camera should still reveal the room's usable shape.
Control the capture. Use a remote phone trigger or a timer so the operator can step out of view. A person standing beside the camera becomes an unwanted focal point in a room designed to sell the property.
Review seams immediately. Check mirrors, door jambs, countertops, and window edges on the phone. A reshoot on location is faster than discovering a stitching defect after leaving.
Clean the nadir. Use the platform's patching tool or a carefully prepared floor mask. The tripod should never dominate the first impression of a scene.
Build buyer-shaped navigation. Place hotspots in the order a visitor naturally walks through the property. An impressive collection of scenes still feels confusing if the tour jumps randomly between rooms.
The file should be reviewed on a phone over cellular data before publication. Studio Wi-Fi can conceal slow loading, oversized files, or a broken embed. Buyers may open the tour on a mobile device, so mobile behavior is part of image quality.
Quality control: If the tour feels slow, confusing, or visually broken on a phone, the listing team shouldn't publish it simply because the source files look good on a desktop.
Cameras, Phones, and AI Panoramas Compared
A dedicated camera is worth buying when a team needs repeatable spherical capture and can use it often enough to justify the production responsibility. It isn't automatically the best choice for every listing. Recent market coverage increasingly points toward prosumer 8K capture, mobile workflows, and AI-assisted stitching, which makes the decision less about camera prestige and more about total operating effort.
The comparison below avoids unsupported price claims. Typical cost per listing varies by equipment ownership, labor, software subscriptions, and whether the team already has listing photography in place.
| Capture Path | Typical Cost Per Listing | Time Per Listing | Best For |
|---|---|---|---|
| Dedicated 360 camera | Equipment and software overhead, then low incremental capture cost | Fast capture, with review and stitching work | Photographers, frequent solo shooters, repeatable in-house programs |
| Smartphone with a 360 app | Low equipment commitment, with possible app or platform costs | Convenient capture, with variable setup and processing time | Budget-conscious agents testing demand |
| AI-generated panoramas | Platform usage or subscription cost, with little camera handling | Fast creation from prompts or existing photos, subject to review | Teams prioritizing speed, broad coverage, and low operational complexity |
The right path by team type
Solo agent on a budget: Start with a phone workflow or AI-assisted platform. The goal is to validate whether clients and buyers use the tour before adding another device, battery, tripod, transfer process, and editing queue.
Mid-size team focused on volume: A dedicated camera becomes more defensible when several people need a consistent capture method. The team should standardize room preparation, file naming, review, and publishing so the camera doesn't create a bottleneck around one technically skilled employee.
Brokerage with centralized media: Quality control and governance matter more than individual camera ownership. A brokerage may combine dedicated cameras for difficult or premium properties with software-generated scenes for routine listings, then route every tour through the same branded and measurable distribution system.
AI isn't a replacement for every real room. It can misrepresent materials, proportions, views, or architectural details if the source image is weak or the generation process invents visual content. For that reason, AI-generated panoramas should be used for appropriate presentation tasks and clearly reviewed for accuracy.
Teams evaluating the business case can also consult Helbling Digital Media's discussion of the ROI of VR for small businesses, which is useful context for judging immersive media as a workflow investment rather than a novelty purchase. Virtual Tour Easy can generate panoramas from text prompts or regular photos, accept uploaded 360 imagery, and assemble scenes with hotspots and information panels. It belongs in the software comparison, not in a blanket recommendation to abandon cameras.
Measuring ROI Beyond Extra Pageviews
Pageviews are a weak success metric. A tour can attract curiosity without producing a qualified inquiry, an appointment, or a useful signal for follow-up. Real estate teams should measure whether the experience improves the quality of the pipeline.
The first meaningful question is whether a visitor engages with the scenes that influence a property decision. Completion by scene can show whether users reach the kitchen, primary suite, outdoor space, or lower level. A team can compare that behavior with lead submissions and subsequent CRM activity, rather than treating every visit as equal.
A practical measurement layer
- Scene engagement: Track which rooms receive attention and where viewers stop. This helps identify confusing navigation or high-interest property features.
- Lead capture: Measure form completion inside or beside the tour. A form should request only information the team can use for follow-up.
- Source attribution: Use campaign links, GA4, GTM, and tracking pixels to separate traffic from MLS, email, social posts, paid campaigns, and QR codes.
- CRM hand-off: Record the tour source and listing viewed when a lead enters the CRM. The sales team needs context before making contact.
- Follow-up quality: Review whether tour-originated leads are qualified, responsive, and ready for a relevant next step.
The broader market is moving toward behavioral tracking, device and geographic data, automated follow-up, and CRM integration, according to QubeHub's analysis of AI virtual property tours. Those capabilities should be evaluated as operating requirements, not optional decoration.
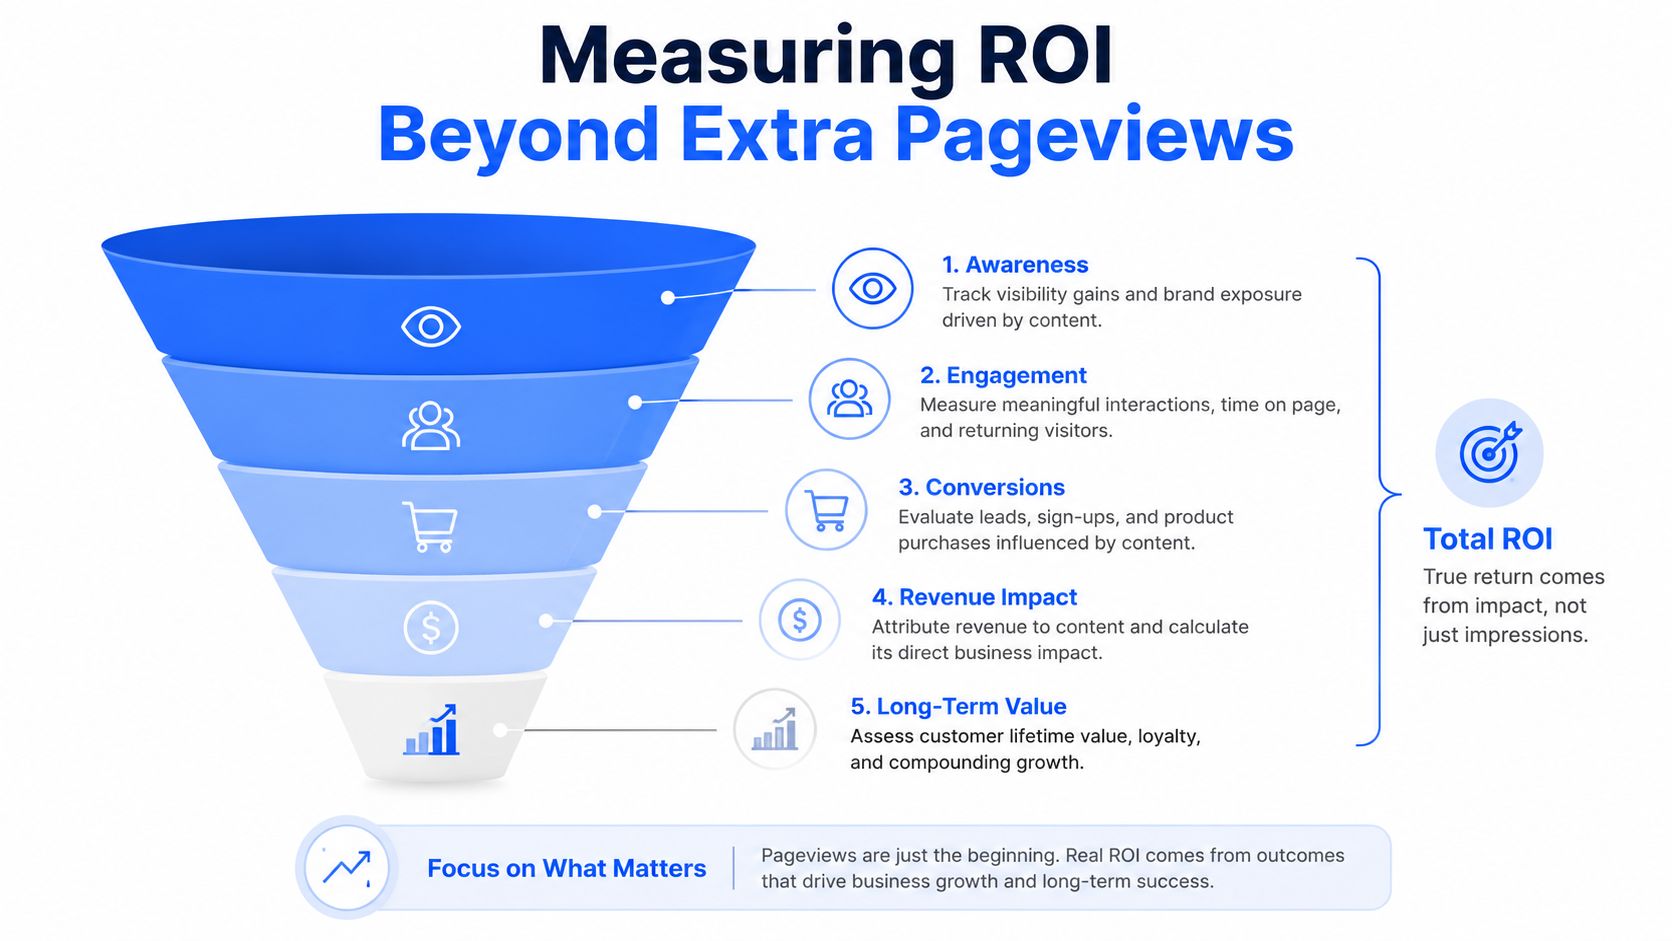
A useful dashboard connects exposure to action: source, engaged visit, scene progression, lead capture, CRM qualification, and appointment outcome. Teams that need a clearer method for assigning credit can use this guide to lead source tracking as a reference for organizing attribution.
Measure the hand-off, not just the hover. The tour earns its keep when it helps the team identify who needs a conversation and what that person already saw.
Publishing, Integrations, and Do's and Don'ts
A finished panorama has no marketing value if the buyer can't find it. The tour should appear where the listing already receives attention, with a clear label, a working link, and a mobile-friendly loading experience.
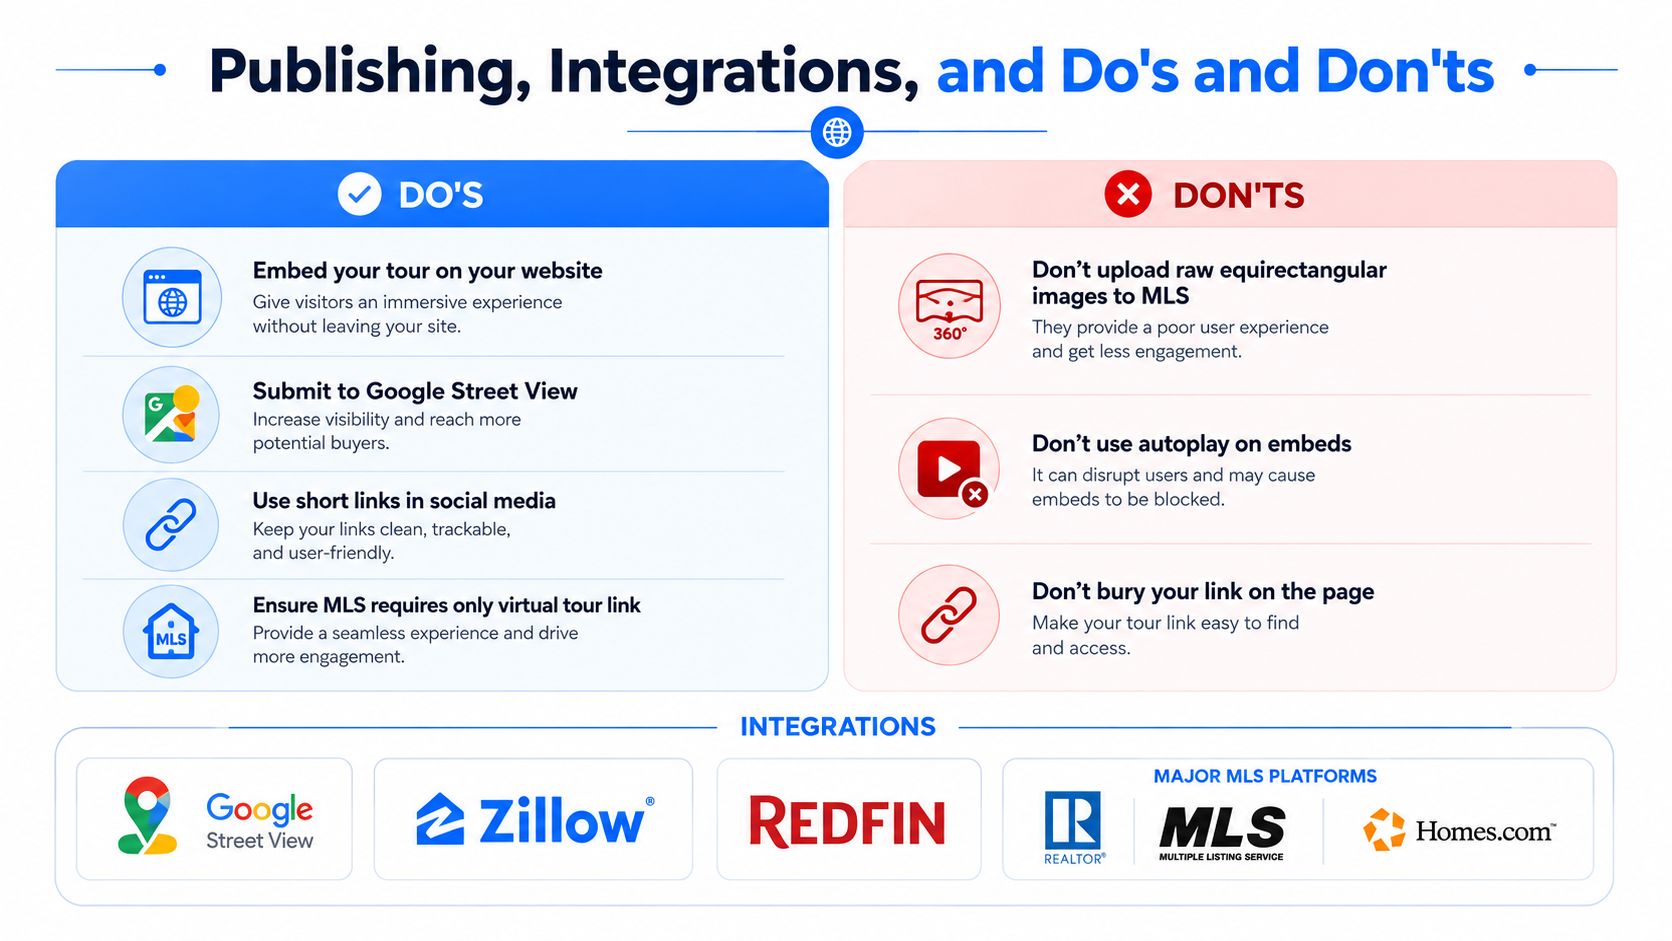
MLS rules vary, so the listing team should confirm whether the local system accepts a virtual-tour link, requires an unbranded version, or restricts how the URL appears. The safest process separates the MLS-compliant tour from the branded website experience, while keeping both versions connected to the same listing asset.
Distribution checklist
- Embed the tour prominently: Place it near the main property media on the listing page, not below an undifferentiated block of text.
- Create a short link: Use a clean URL for email, social posts, printed materials, and QR codes.
- Publish selectively to Google Street View: Follow the platform's requirements and confirm that the public scene represents the property accurately.
- Connect analytics: Configure GA4, GTM, and relevant pixels before promotion begins.
- Offer an unbranded path: Keep a compliant MLS destination available when local rules require it.
- Test every device: Check the tour on a phone, tablet, and desktop before sharing it publicly.
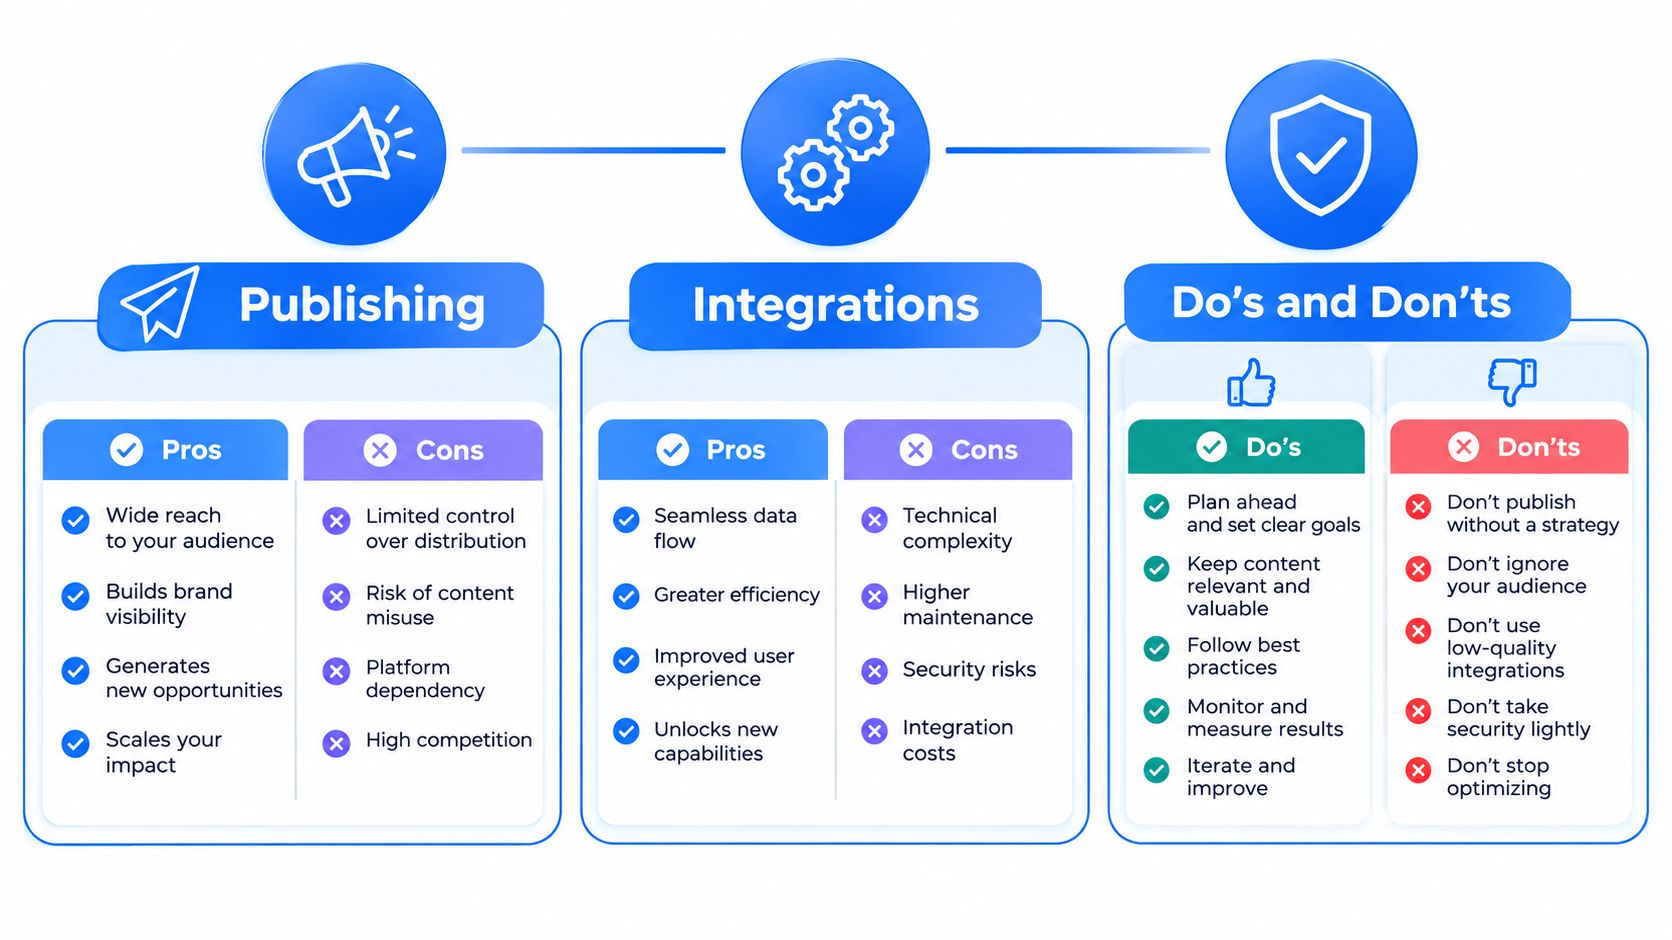
Do add lead capture at a natural point in the experience, such as after a visitor has explored enough of the property to understand its value. Don't force autoplay audio, because unexpected sound can make a mobile visitor close the page. Do use a custom domain or consistent branding where the team controls the destination. Don't bury the tour beneath the hero image, where most visitors won't discover it.
The publishing layer should support the sales process, not only the visual presentation. Virtual tour publishing guidance for real estate covers the role of links, embeds, and distribution in making an immersive experience accessible beyond the original capture device.
Your 90-Day 360 Rollout Plan
A 360 program should earn its next investment through evidence. The rollout below gives a solo agent, team lead, or brokerage operator a clear way to test the camera-versus-software decision without committing to a large production change.
Days 1 through 30
Choose one capture path, dedicated camera, phone workflow, or AI panorama platform. Produce two pilot listing tours using the same room-preparation checklist, navigation logic, and publishing destination. The deliverable is a documented workflow with the person responsible for capture, editing, publishing, and lead follow-up.
Days 31 through 60
Publish the tours through the intended MLS and website routes. Add analytics, a lead form, campaign links, and CRM source fields before promoting them. The deliverable is a baseline report showing traffic source, engaged scenes, lead activity, and any technical failures.
Days 61 through 90
Review whether the tours generated useful conversations, cleaner buyer qualification, or less wasted showing effort. Decide whether to upgrade the camera, simplify the workflow, add a dedicated editor, or move more listings to an AI-assisted process. The deliverable is a written operating decision, supported by the pilot data rather than by a camera ranking.
A dedicated 360 camera is worth buying only when the team can repeat the process and measure its commercial value. If capture creates more labor than useful buyer intent, software is the better tool.
Virtual Tour Easy lets real estate teams create immersive tours from uploaded 360 images, regular photos, or text prompts, then add scenes, hotspots, labels, embeds, short links, and analytics without requiring specialized camera production. Visit Virtual Tour Easy to test a camera-light workflow against the team's actual listing and lead-generation process.