A prospective buyer is sitting on a sofa, reviewing a property listing on a tablet. Instead of scrolling through a fixed gallery, the buyer drags across the screen and looks toward the windows, turns toward the kitchen, and checks the room's proportions. A hotel guest can use the same interaction to inspect a suite before booking, while a student can explore a campus building without visiting in person.
That experience comes from a 360 photo viewer, a digital interface that displays a panoramic image and lets visitors control which direction they see. For businesses, the value isn't mere novelty. A viewer can help people inspect a home, understand a venue, compare a hotel space, or study an environment remotely. The quality of that experience depends on more than image sharpness, however. Visitors also need reliable controls, clear orientation cues, accessible alternatives, and a layout that works on the devices they already use.
Table of Contents
- Introduction to Immersive Viewing
- How 360 Photo Viewers Work
- Formats and Compatibility
- Evolution of Interactive Panoramas
- Accessibility and Spatial Orientation
- Embedding and Sharing Options
- Optimizing 360 Images for Viewers
- Conclusion and Key Takeaways
Introduction to Immersive Viewing
A buyer entering a virtual property tour may begin in the living room. A drag across the image reveals the fireplace, another movement points toward the hallway, and a hotspot opens the kitchen. The visitor isn't watching a video with a fixed camera path. They're choosing the direction of view inside a captured space.
This distinction makes a 360 viewer useful for real estate, hospitality, education, architecture, restaurants, and event venues. A hotel can show how a room connects to a balcony. An architecture studio can present an interior before construction is complete. A school can provide remote visitors with a practical sense of corridors, entrances, and shared spaces.
A modern viewer usually combines a panorama with interface elements such as drag controls, zoom, scene transitions, hotspots, captions, and a reset view. Those features should support the visitor's mental map rather than compete with it. If a person can't tell which room they're viewing or how to return to the entrance, a technically impressive panorama becomes difficult to use.
The most effective tours treat immersion as a means, not the objective. The visitor should quickly understand where they are, what they can inspect, and what action comes next, whether that action is booking a viewing, requesting a quote, finding a classroom, or contacting a venue.
How 360 Photo Viewers Work
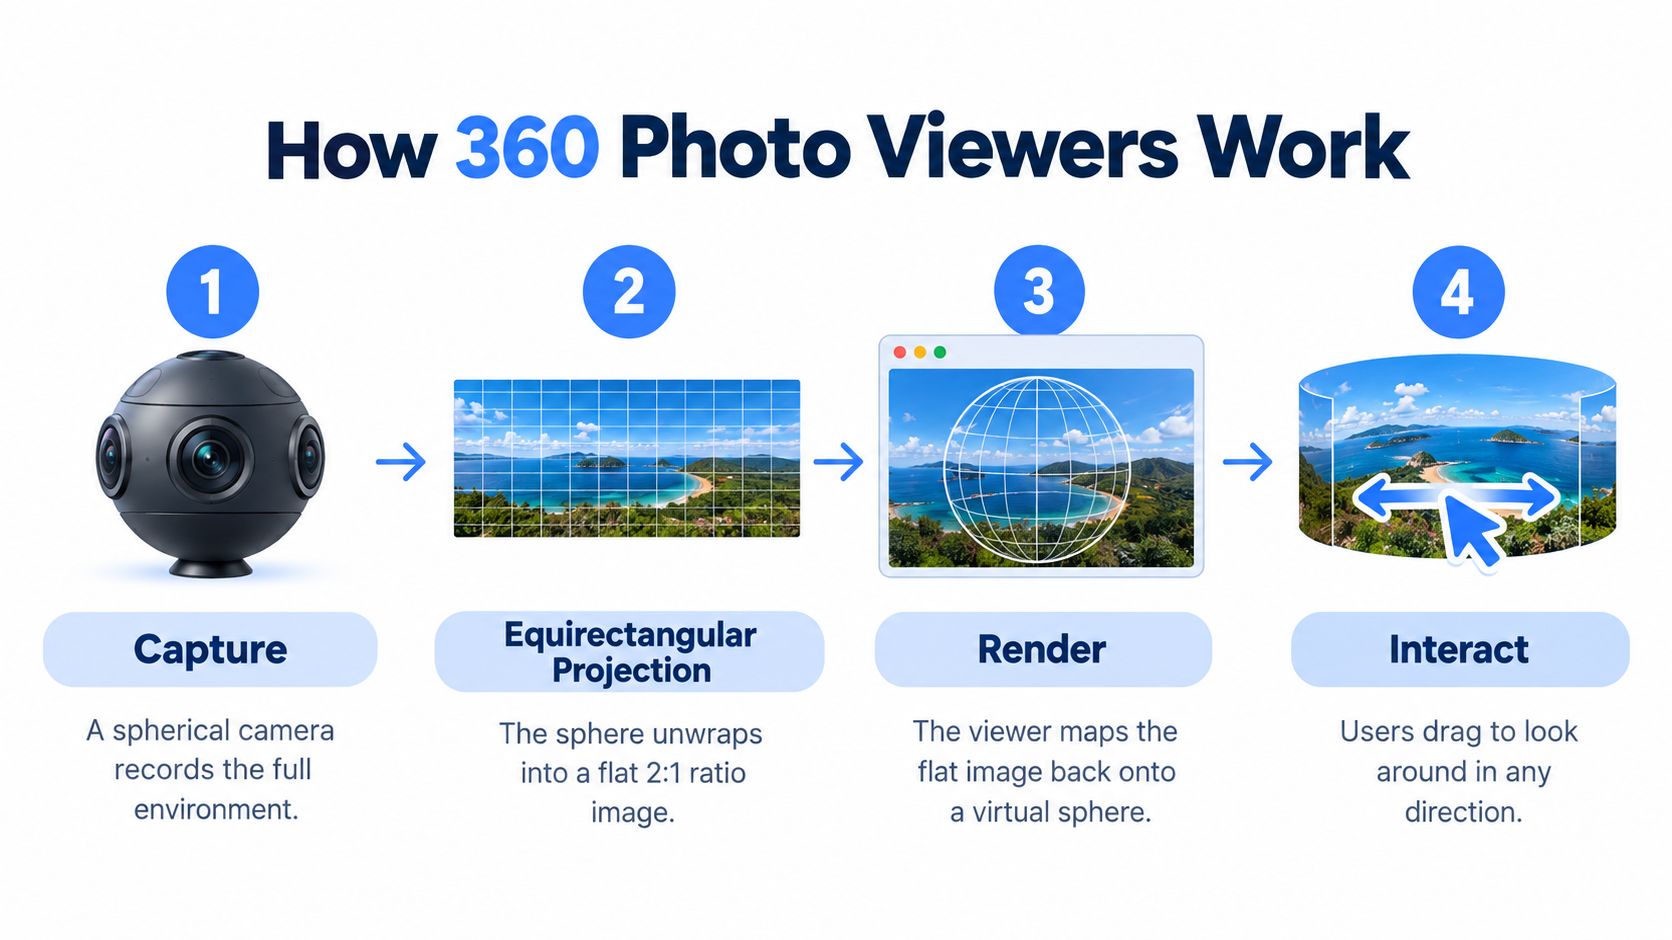
A 360 photo viewer starts with a panorama that represents the surrounding environment as one continuous image. The usual source is an equirectangular panorama, a flat representation of a sphere with a strict 2:1 width-to-height ratio. The image resembles a world map: areas near the top and bottom become stretched because a spherical surface has been opened and laid flat. Google's spherical metadata documentation describes the image and metadata conventions used for spherical imagery.
A conventional wide-angle photograph can't replace this source. It may show a broad section of a room, but it doesn't contain continuous coverage in every direction. A 360 image viewer needs the complete panoramic surface so it can reveal different portions as the visitor drags, swipes, or uses a headset.
From flat image to interactive scene
The viewer maps the flat panorama onto the inside of a virtual sphere. The visitor stands conceptually at the center of that sphere, looking outward at the image surface. As the viewing direction changes, the software displays the corresponding region of the panorama.
WebGL commonly performs this real-time rendering in the browser. It uses the device's graphics capabilities to redraw the scene as the visitor moves around. That's why a tour can feel smooth on one phone and sluggish on another, even when both devices open the same page.
The viewer also controls the horizontal field of view. A wider setting exposes more of the environment but makes individual objects appear smaller. A narrower setting can help a visitor inspect a window frame, countertop, or architectural detail, though it requires more panning.
Practical rule: Treat the panorama as the raw spatial material and the viewer as the navigation system. A strong image can't compensate for confusing controls or poor orientation.
For Virtual Tour Easy, implementation should include a WebGL check before a tour loads, a static preview or other non-WebGL fallback, and image delivery that responds to the visitor's screen and device capability. These choices reduce unnecessary processing and give visitors a usable path when interactive rendering isn't available.
Formats and Compatibility
The format decision starts with the source image. A JPEG equirectangular panorama is common for photographic tours because it provides broad browser compatibility and keeps file sizes manageable. PNG can be useful when transparency or lossless editing matters, but it often creates heavier files for photographic scenes. The projection matters as much as the file extension. A normal horizontal photo won't become a complete spherical environment merely because it has been uploaded to a viewer.
A practical compatibility check should cover four areas:
- Image structure: Confirm that the panorama represents the complete environment and follows the required 2:1 ratio.
- Browser rendering: Test WebGL availability before loading the interactive scene.
- Device behavior: Check touch gestures on phones, pointer controls on desktops, and display behavior on larger screens or headsets.
- Fallback access: Offer a static preview, conventional photo gallery, floor plan, or text description when spherical rendering isn't available.
Responsive delivery is especially important on mobile devices. A phone shouldn't decode a needlessly large panorama when a smaller version can serve its display effectively. The viewer can select suitable image resources based on screen dimensions and device conditions, while the original high-resolution asset remains available for larger displays where detailed inspection matters.
Teams preparing images outside the tour platform can consult this export formats guide to understand how different export choices affect downstream use. For a practical publishing workflow, the 360 photo online guide can help connect image preparation with browser-based presentation.
A viewer also needs clear loading behavior. A preview or progress indicator tells visitors that the scene is being prepared, while a failure message should explain what happened in plain language and offer another way to continue. Compatibility isn't just a developer concern. It determines whether a prospective customer can access the space at all.
Evolution of Interactive Panoramas
Interactive panoramas existed long before today's mobile browsers. Apple's QuickTime VR was conceived in 1991 and released publicly in July 1995, creating a major milestone in the development of the modern 360 viewer model. The system could stitch ordinary still photographs into an interactive panorama instead of requiring a dedicated 360-degree camera. A contemporary account of QuickTime VR's development and release describes how users explored panoramic scenes and photographed objects from multiple angles.
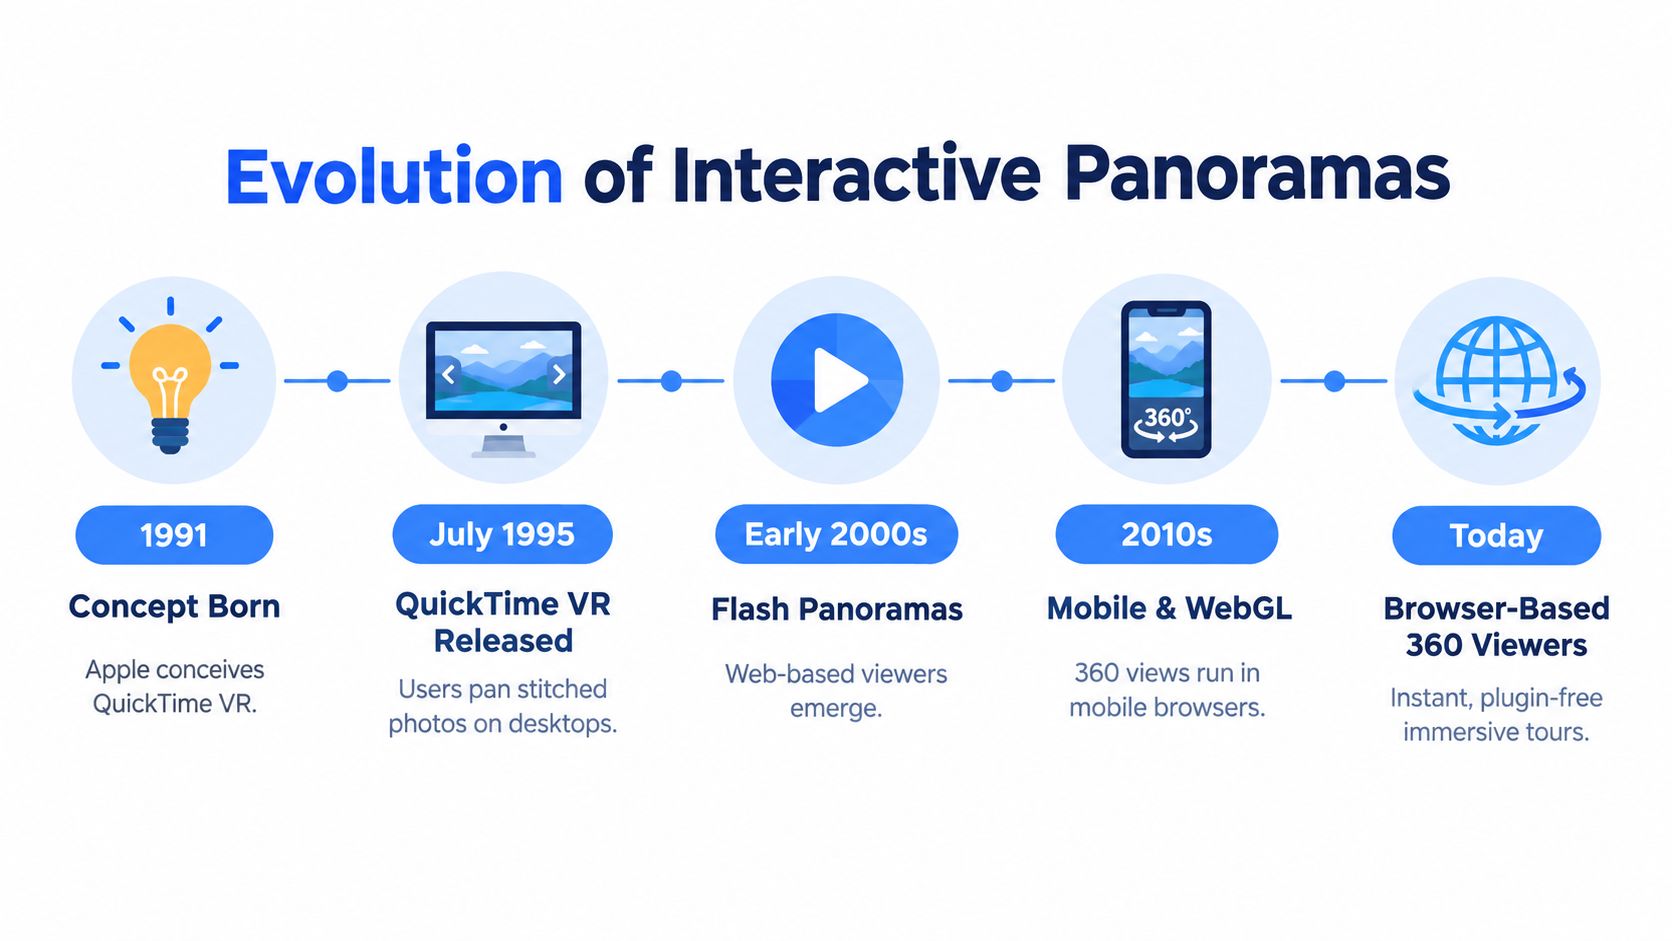
The early system established the essential interaction still familiar today: a panoramic image is mapped into an immersive field of view, and the visitor controls the visible direction. QuickTime VR supported both room-like panoramic scenes and object viewers assembled from photographs taken at multiple angles.
Its commercial use also showed that interactive imagery could reach audiences outside specialist research. The November 1995 Star Trek: The Next Generation Interactive Technical Manual reportedly became the first retail product to use QuickTime VR and sold more than 200,000 copies, as documented in the historical account above. NBC News later adapted the technology for panoramic crime-scene imagery during the O. J. Simpson murder trial.
The delivery mechanism has changed from desktop software and plugins to browser-based rendering, but the underlying idea remains stable. Businesses still capture or assemble a spatial image, place it inside a viewer, and let visitors control their viewpoint.
That history helps explain why current tours feel familiar even when they run instantly on a phone. The industry has improved capture, rendering, sharing, and interaction, but the core promise remains remote spatial inspection.
Accessibility and Spatial Orientation
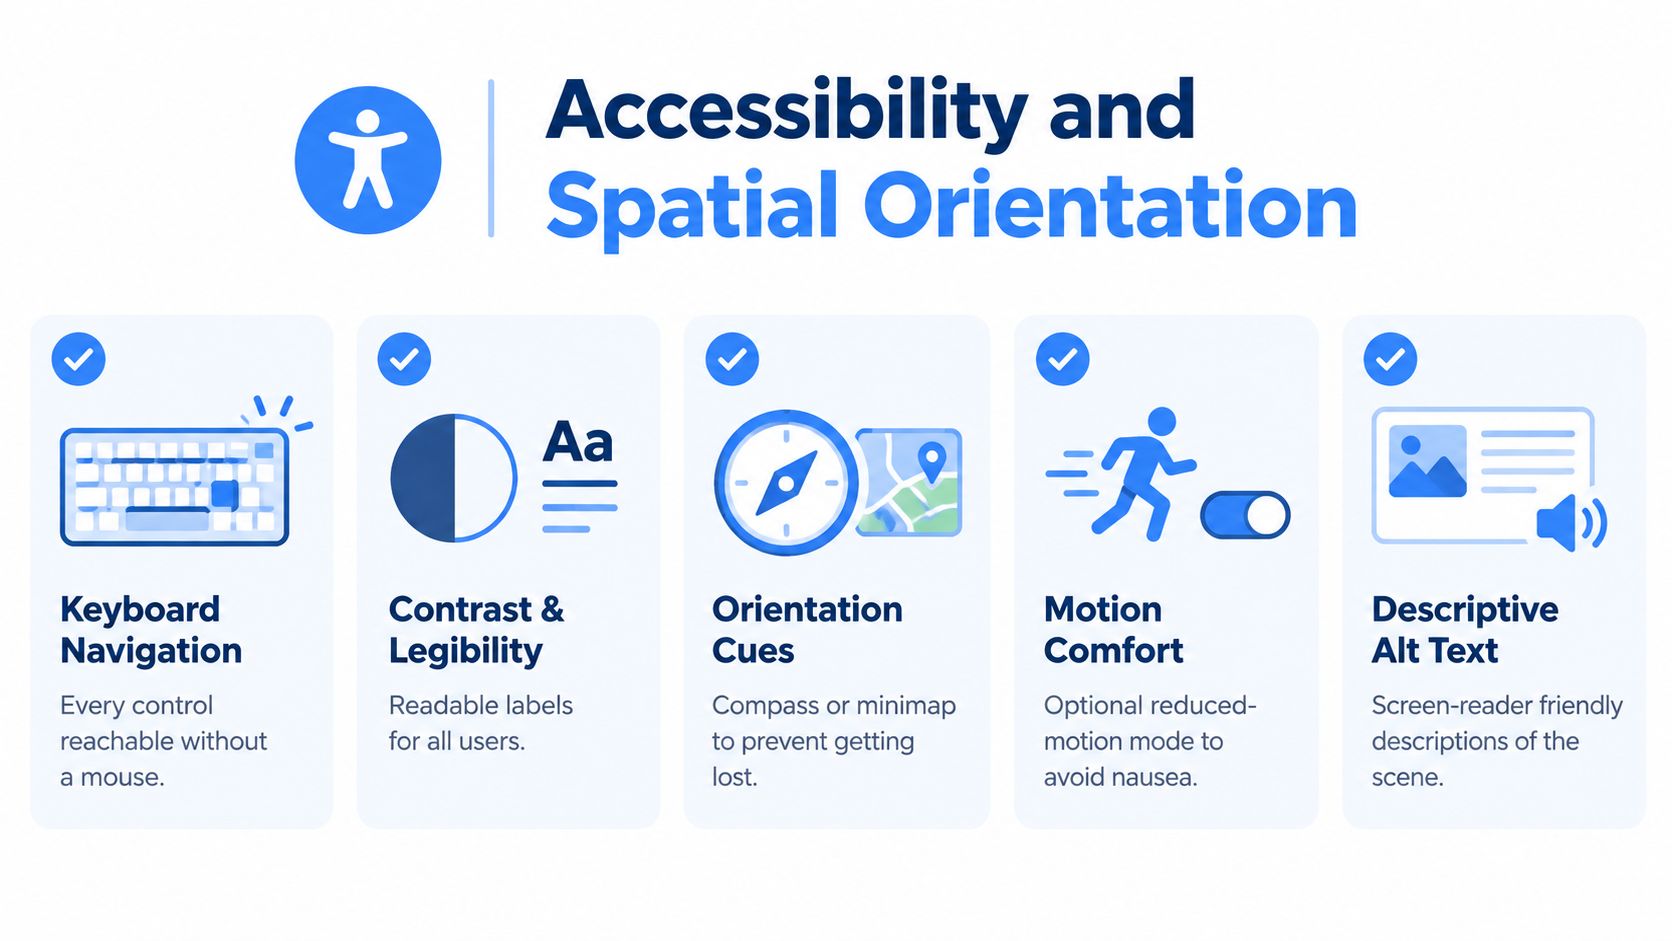
A sharp panorama can still fail a visitor. The most serious problems often involve accessibility and orientation, not image quality. Someone using only a keyboard may be unable to reach a hotspot. A visitor with low vision may struggle with low-contrast labels. A person with cognitive or vestibular disabilities may need clearer instructions, reduced motion, and an alternative way to understand the space.
A 2025 systematic review found that only three studies in the examined immersive-technology literature formally evaluated accessibility, while four addressed physical discomfort. The authors described the limited evidence as methodologically tentative in their systematic review of accessibility and discomfort. A separate 2025 study of virtual-reality tourism applications recommends keystroke navigation, cognitive-support guidance, contrast and color options, and variable font sizes.
Design for orientation, not just movement
Visitors need to know more than how to rotate an image. They need to understand their location, the available destinations, and the route back.
Useful orientation features include:
- A mini-map or floor plan: Show the current scene and make connected spaces visible.
- A stable starting view: Face the entrance, primary feature, or next relevant action.
- Scene labels: Use names such as “Lobby,” “Room 204,” or “North Courtyard,” rather than unexplained icons.
- A reset control: Return the camera to a predictable viewpoint after exploration.
- Breadcrumbs and backtracking: Make previous scenes easy to revisit.
- Distinct hotspot styling: Separate interactive controls from decorative elements.
Research comparing physical museum visits with a photo-based 360 tour found that physical visitors rated navigation ease, orientation, and backtracking more highly, even though several overall experience measures showed no significant difference. A 2025 campus-tour UX study reported 85.1% satisfaction and identified mobile as the preferred access method, while still recommending better mobile display quality and navigation. These findings point to a practical lesson: visitors may accept immersive imagery while still losing their sense of place.
Non-visual access requires more than alt text on the panorama. Provide scene descriptions, captions, transcripts for spoken content, audio description where appropriate, and a conventional photo or floor-plan alternative. Test every control with a keyboard and screen reader, increase text size, inspect contrast, and check whether scene changes cause disorientation.
Accessibility is part of the tour's navigation model. It can't be added only as a compliance label after the viewer has been built.
Embedding and Sharing Options
A 360 tour can reach visitors through several distribution methods, and each method suits a different business goal.
| Sharing method | Useful for | Main consideration |
|---|---|---|
| Short link | Listings, email, social posts, messaging | The destination page must explain the tour immediately |
| Website embed | Property pages, hotel sites, venue pages | The frame must resize correctly on smaller screens |
| Google Street View publishing | Public place discovery and map-based access | Scene naming and navigation should remain understandable |
| Dedicated tour page | Campaigns, education, event promotion | The page should connect exploration with a clear next action |
A short link works well when a real estate agent sends a tour to a buyer or a hotel adds a scannable destination to printed material. An embed keeps the experience close to the property details, booking form, or contact button. A map-based presence can help visitors discover a venue while they're already evaluating nearby places.
The choice should follow the audience's context. A campus tour may need a public landing page with captions, building descriptions, and a floor plan. A hotel may prioritize an embed beside room amenities and a reservation action. An architect may prefer a branded project page that separates several scenes by construction phase or design area.
Responsive design matters in every case. The viewer should fit the available width, keep controls large enough to operate by touch, and avoid forcing visitors to rotate their device unexpectedly. Browser testing should include touch input, mouse input, keyboard focus, loading failure, and orientation changes.
For businesses placing a tour on Google Maps, the guide to uploading a 360 photo to Google Maps provides a focused publishing reference. Distribution succeeds when the tour is easy to open, easy to understand, and directly connected to the decision the visitor needs to make.
Optimizing 360 Images for Viewers
Image optimization begins with the visitor's device, not the camera's maximum output. A large panorama can preserve detail, but it may also increase download and decoding work on a phone. Responsive image delivery lets the viewer serve an appropriate resource for the screen rather than sending the heaviest file to everyone.
A useful optimization process looks like this:
- Inspect the source: Check the projection, dimensions, stitching, horizon, and areas near the nadir and zenith.
- Create responsive variants: Prepare suitable resources for phones, desktops, and larger displays.
- Compress carefully: Reduce unnecessary file weight while protecting text, edges, and architectural detail.
- Load progressively: Show a preview or initial scene before asking the device to process every tour asset.
- Test real interactions: Drag, zoom, change scenes, open hotspots, and return to the starting view on representative devices.
The field of view requires a separate decision. A wide field shows more of a room and can help visitors understand overall layout. A narrow field makes a doorway, finish, fixture, or structural detail easier to inspect, but it increases the amount of panning required. The starting view should therefore match the visitor's purpose. A hotel may face the bed and window; a property listing may face the room entrance and strongest feature.
Teams seeking broader web-performance guidance can review boost site speed with image optimization. For viewer-specific controls and image behavior, the image quality settings guide offers a relevant reference.
WebGL detection should happen before the tour loads. If the browser or graphics hardware can't support the interactive experience reliably, the page should present a static preview, conventional images, descriptive content, or a floor plan instead of leaving visitors with a blank canvas.
Conclusion and Key Takeaways
A 360 photo viewer turns a panoramic image into an explorable environment. The underlying process depends on an equirectangular source, spherical rendering, browser graphics support, and controls that let visitors choose their direction. Those technical parts matter, but they don't define the whole experience.
The strongest tours solve two human problems first: access and understanding. Visitors need alternatives when they can't use a visual panorama, and they need orientation cues when they can. A mini-map, scene label, reset view, back button, and clear hotspot design can make a larger difference than another increase in image resolution.
A practical launch checklist should include:
- Source validation: Confirm the panorama uses the expected spherical projection and correct proportions.
- Device testing: Check touch, mouse, keyboard, screen-size changes, WebGL behavior, and headset viewing where relevant.
- Fallback content: Provide a static image, conventional gallery, floor plan, or descriptive scene alternative.
- Accessible controls: Make buttons keyboard reachable, labels legible, text adjustable, and motion manageable.
- Spatial cues: Set a purposeful starting direction and identify rooms, paths, and destinations.
- Performance planning: Use responsive image delivery, progressive loading, and sensible field-of-view settings.
- Conversion alignment: Place booking, inquiry, donation, enrollment, or visit actions where visitors can find them.
- Usability measurement: Review tour completion, scene exits, backtracking, dead-end clicks, and interaction with calls to action.
Virtual Tour Easy is one option for teams that need a web-based workflow for uploading existing 360 images or creating 360 scenes, then arranging them with scenes, hotspots, information panels, audio, and custom starting views. The important evaluation question isn't whether a tour looks immersive. It's whether visitors can enter, understand the space, move through it comfortably, and complete the next step.
A tour should be tested with a keyboard user, a mobile visitor, someone unfamiliar with the building, and someone who needs a non-visual alternative. Those tests reveal problems that technical checks alone miss, especially when visitors lose their place or can't reach a control.
Virtual Tour Easy helps real estate, hospitality, education, and design teams create and share interactive 360 tours with scenes, hotspots, and device-friendly viewing. Visit Virtual Tour Easy to explore a practical way to publish accessible, oriented virtual experiences without requiring specialized software.